Showing posts with label lavender. Show all posts

Saturday, November 7, 2009

Thanksgiving Early

Today was a special day. One for which I have been preparing for some time. Living on a small farm is about getting intimate with the Earth. To build a connection. Or rather to live the connection to the Earth explicitly. Modern life has in many ways removed us from a basic truth, that we are bound to her. Our life comes from her soil, and from her water, and from her air. Modern life brings us food in a store, water in plastic bottles, and yes, I have even seen "oxygen bars" in the city where air comes in cans too. This world is an illusion. It is not real.

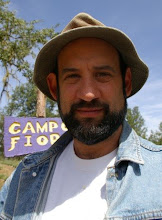
Meet Hec-ace. He is in the photo to the right. Hec-ace blessed our farm today with a visit. When he arrived, he said I was blessed for I was living a dream. I agree. And in some ways, the modern life is the real dream, and this is reality. Where life and strength come from the Earth, not from a plastic box.

Hec-ace (which means Mountain Lion) came today to bless the farm and the people here with a saging ceremony. Just, as he describes, to say "Thank you" to the Earth and the people for giving us the gifts that we need to live. He burned sage, and purified everyone, because as he says, you cannot purify if you are not pure yourself. And then he said his thank you. We turned to the East, and thanked the rising sun on which Life depends. We followed to the South, and to the West, and finally the North expressing thanks for all the things we often take for granted: the water we must have to drink and for our crops, and the air, and the birds, and yes, the insects. They are all part of the system that brings us strength.

The ceremony reaffirms my commitment to using the land naturally, without chemicals and without pesticides. To respect the systems that have been here a thousand years before my short life, and will be here a thousand more after I leave. To draw strength from the land and take care of it, but not to exploit it. I like to think of it as living like the honey bee: to take what is needed, harm nothing, and leave the world better than before.

Responding to Hec-ace's words, the winter fava I planted a few weeks ago sprout tall now. Well, his words, and the light rain we had just last night. But that is what he said. Just as the Rolling Stones sing: you get what you need. We needed rain. This is true with faith.

Today I was doubly blessed. For after the blessing, there was a Holiday Faire amongst the olive trees in a grove on Carmel Valley Road. It was a wonderful event. What better life than to share the produce of the Earth with people who are happy?

Today, people celebrated. Us on Lavender Hill, and people in the olive groves. They enjoyed some lavender bread samples I had made earlier this morning. They enjoyed our essential oils grown and distilled right here on the farm. And they enjoyed our soaps. Interestingly today, they especially enjoyed our massage oil. A coconut oil base mixed with Carmel Lavender essential oil.

The perfect antidote for the tensions of our modern world.

Peace to you all this season.

Tuesday, December 9, 2008

Mesa del Sol Lavender

At a farmers market a couple of months ago, I met Ann, the owner of the Mesa del Sol winery. Ann said that she had quite a bit of lavender that she harvested from their lavender plants at their winery in Arroyo Seco. At their winery, they have a long drive alongside the vineyard leading up to the house, and both sides of the driveway is lined with lavender!

The lavender has been harvested already, and Ann needed help distilling the essential oil. So I took a ride out to Mesa del Sol, which is actually fairly close to my farm. It is quite a stunning property. If you are interested, you can check it out on their website (http://www.mesadelsolvineyards.com/). There is an adorable historic farmhouse. Ann is an architectural designer, so the whole place is done esquisitly. There is even a very charming rock-walled workshop and a gorgeous pool and grounds. My son and I got the grand tour. There is a stunning view of the Arroyo Seco river (which is going quite nicely). And an ominous view of the burned hillsides from this year's Indians Fire which got quite close. Ann grows her own vegetables there as well, so we got a wonderful tour of the private garden.

The lavender was sacked in very large burlap coffee sacks. We stuffed the truck full to the brim on our first load. In the photo on the right you can see the sweet smelling load. We called them giant sachets. The ride home was absolutely intoxicating. We played loud music to keep us from slipping into a lavender induced coma while driving home.

I'm preparing the distillery now for the distillation. This should keep me busy for the rest of this week and most of next too most likely.

I have a feeling my truck is going to be smelling mighty fine for quite some time!!

Saturday, September 13, 2008

The Art of Local Soap Making

This week Elizabeth, my neighbor and co-op partner, called to tell me that she was making Castile soap. Castile soap is a soap that is made exclusively from vegetable oil, and commonly used to refer to soap made from olive oil (you can find more information about Castile soap on Wikipedia here). Elizabeth is a soap maker, so making soap is not necessarily a unique event at Lizard's Creations, but today it was different. This particular batch is a milestone in a concept that she and I have been exploring with our Co-op: How to live more local?

Living the Vida Local

So how do we live the Vida Local? With vegetables, the answer is simple. We set a geographic radius (50 miles) and receive all of our vegetables grown from within this area. My lavender is also rather straight forward, the lavender is grown here on my farm, and the essential oils and hydrosols are manufactured here. A radius of zero. But when you go up the chain and start thinking about applying local to things like soaps, what does it mean? Elizabeth has of course always crafted her soaps locally. And as we started working together, she began integrating my local lavender oils and buds into the process. This got her to thinking: how far can I go using all local ingredients?

Many of her soaps include ingredients include oils such as palm oil, and other ingredients that are just not produced locally. But with creativity, there is always an answer. That is where a serendipitous meeting she had w/ Carmel Valley Olive Company created an opportunity. This local farm and producer of olive oil less than ten miles away. Elizabeth asked the essential question, can I make this into a locally made, and locally grown Castile soap? If the olive oil and the essential oils were local, then the bulk of the primary ingredients (save the lye used to induce saponification) would be entirely local as well. Imagine the carbon savings if gallons upon gallons of heavy oils were no longer shipped from abroad, but rather obtained locally from a few miles away!

Today was the day to put this ideal into practice. Being such a significant event, I grabbed my camera and headed over to watch and record the history.

Making Soap

Dressed in her blue and white soap making smock, Elizabeth had already prepared the lye mixtures according the careful measurements. I carefully handed her my contribution, Carmel Lavender essential oil from this year's harvest and distillation (read my previous blog entry on the Lavender Oil Harvest here). She was about to begin measuring the bounty from Carmel Valley Olive Company, so we went into her soap workshop to begin making local soap.

With soap making, the measurements are absolutely critical. Without precise measurements, the saponification process will not be right. And if the saponification is not right, the soap will not be right. Elizabeth began measuring out the oil very carefully on here scale. Look at the beautiful golden green color of the oil. The smell of delicious olives filled the room. What a wonderful way to start a soap. We also measured out the essential oil, and set it aside for later.
Next the oil needed to be heated to a precise temperature. For this, the oil was placed on the stove, and Elizabeth carefully monitored the temperature with a thermometer. Likewise, the lye solution I mentioned earlier needed to reach the proper temperature as well. interestingly, the reaction of the solution had naturally preheated the solution, so for this, it is a waiting game for the temperature to cool as the reaction slowed down. She told me that at times she could float the mixture in cool water to help cool it. But today, that was not necessary.
Once the oil and the lye solutions reached the proper temperatures, they were mixed together. This is where it got tricky. Elizabeth told me that the soap now needed to "trace". I.e. when saponification started, it should begin hardening. As you mix the solutions together, this leaves traces behind the spatula. The tricky part is that usually the soap recipes have other oils and fats in the mixture. Pure olive oil was a new experience. And apparently some of her research told her that the tracing stage could take some time. Or maybe never? We really didn't know. So we mixed. And mixed. And mixed. And mixed. After a few hours of mixing, Elizabeth made the call that the saponification was going to take some time if it were going to happen. She would monitor it through-out the day, and give me a ring if it started to trace. So at this point, I collected my camera, and called it a day. I left with a lot of anticipation. The idea of locally grown ingredients is very compelling. I very much wanted to get a good shot of the hardening soap in the mold. But this would have to wait until the soap is ready.
Soap History - The Soap Maker's Birthright
While we were waiting, Elizabeth pulled out an old dry cake of soap in a dish. "Here, look at this" she told me. She continued that this cake of soap was made by her grandmother in the 1940's. You can see the dry cake of antique soap in the photo to the right. It turns out that Elizabeth's grandmother was a soap maker. She made handmade soaps in Nebraska during the war. Her contribution to the war effort. Coincidentally, her grandmother was also called Elizabeth. And even though Elizabeth told me that she never had the opportunity to learn soap making from her grandmother, I felt that the connection was an important one. For 70 years soap had been made in her family. The basic process of saponification has remained the same, and so must have been the need for precise temperature and measurements. And yet in a world that is so different. Here we are today, trying to simplify life by making local products. A luxury in today's time, thought most likely a necessity in yesterday of 70 years.
Meanwhile, back in good ole' 2008...
I had returned home. I called that evening, but no trace. I called the next day, still no trace. We were starting to lose heart. Perhaps no amount of patience would bring saponification. On the third day, I called, and almost reluctantly asked, "well, did it trace?" YES! It had traced! Apparently we were a day short on the patience. Today it was hardening. Elizabeth had already poured the soap mixture into the molds. But I wanted a victory shot for this article. So I picked up my camera and headed over. Wow, what a color! The dark golden green had changed to a buttery yellow / beige. The soap was not solid and no longer even jiggling in the wooden mold. Here the soap will rest, probably for a couple of weeks to further harden and cure.
Once the soap completes the curing process, it will be removed from the mold, cut into bars, and wrapped in the signature wrapping of Lizard's Creations. The locally made and locally grown soaps will be available in locally owned retail shops, such as the Diamond Horseshoe in Carmel Valley, as well as through the Co-op (you can purchase Lizard Creations soaps at the coop website here).
A beautiful soap for a beautiful dream. I feel fortunate to be part of the journey to rediscover how to work together as a community to provide for the essentials of our life, be them food, soaps, or whatever.

Saturday, September 6, 2008

The Honey Harvest

Last Sunday, after my visit to Catalan Farms, my son and I prepared to harvest some honey. I've spoken quite a bit in previous articles about the difficulties that I've had with the new hives this year. The good news is that the established bees from last year seem to be doing quite well. So whatever the affliction, the stronger colonies seem to be able to withstand it. This year was not a complete bust. While very small, there was indeed some surplus honey for us humans to enjoy.

After collecting the frames of golden honey, we headed over to neighbor Steve's house. Last year, Steve and I, together with another fellow beekeeping neighbor, went in even on honey extraction equipment. Steve is a year ahead of me in terms of establishing his colony. Last year we got to sample his bee's miracle. This year, we get to see what mine can do. We decided the easiest thing to do was to transport the frames over to his house and do the extraction there.

Bees are orderly creatures. When they finish filling up a honey cell with delicious honey, they cap it off with a nice cap of wax. The first step in extraction is to perforate these caps so the honey can flow out. There are many ways to do this including electric capping knives that get hot and slice the caps right off. Well, we used the "poor man's" tool called a scratching tool. In the photo on the right you can see the tool; essentially it is a series of needles on a handle that you rake across the comb, perforating the caps so that the honey can come out.

Once the caps are scratched, we placed the frames in the extractor. The extractor is essentially a centrifuge. The frames are placed inside, and are spun at high speeds by cranking the handle. The centrifugal force (okay, for physics folks, there is no such thing, but this isn't a physics class now is it :) pulls the honey out of the cells where it sticks to the walls and slowly slides down the sides, collecting at the bottom. There it creates a gorgeous pool of honey. We repeated this step multiple times until all the frames of honey had been evacuated.

The evacuated frames are just the empty comb with scratched caps. These frames I put right back into the hive after extraction. One of the benefits of writing this article post-facto is that I can report that I peeked inside a couple of days ago, and the little bees had already finished repairing most of the damage to the comb from the extraction, and the had cleaned out and repacked the residual honey. Harvest season over, their work now is for them alone.

Back to the honey harvest, we can now open the gate at the bottom of the extractor and watch the beautiful dark amber honey flow out! This is strained through a double strainer to remove the little pieces of wax that came from the broken caps. The pure honey flowed through the strainer (very slowly that is) and collected in the honey pail beneath it. I must admit that we all took a little sample of the honey at this point (just to make sure it was good, of course). And it was absolutely fabulous. The biggest surprise was the subtle but very distinct taste OF LAVENDER! Yes! Lavender! The bees obviously were hard at work in the lavender fields and brought this back in the pollen they used to make the honey. It was truly a wonderful taste that I did not expect and was quite grateful for the experience.

Most of this work was done indoors, as with hives nearby, the process tends to attract the bees to reclaim the fruit of their labor. However, at the end, we brought the extractor outside and let the heat of the sun warm up the barrel. This helped get more of the honey stuck to the sides to flow faster.

Then we poured the pure honey from the honey pail into 1/2 pint
mason jars ready for the table! This year, I will share the bounty with our Co-op subscribers.
Given the limited quantity, it will have to be on a first come, first served basis. The price will be $8.50. If you are interested, you can contact the Co-op coordinator at http://www.carmelvalleycoop.org/, or you can visit Carmel Lavender Contacts by clicking here.

With all of the trouble that I have had this year with the bees, this experience was a reminder of the rewards of success. It has given me new resolve to try to work through the problems I have had and restart the colonies next year. This week I have checked the progress of the re queening I wrote about earlier. Unfortunately the re queening seems to have failed and the colony is dead. But the hive next door still lives and from the remaining I will get things going again next spring. Despite the trouble, it is a fantastic experience working with these amazing little creatures.

Thursday, August 28, 2008

God Save the Queen

Around 11 o'clock, the phone rang. It was Sue at UPS. "Your bee is here!" On Tuesday I had decided to try re-queening one of the stronger hives that had no brood or queen. Her majesty lifted off Wednesday from just north of Sacramento to make the day journey down here to Carmel. Well, she probably went by truck. But it is 11am, and she is here. So I finished my tea and jumped in the car and rushed down to pick her up.

There she was waiting on a "special counter" at UPS. I peered into one of the air holes and could see a tiny wooden queen cage glued firmly in the center of the box. I would wait until I got back to the farm to open it. But I did have to run an errand over at Pebble. So with Queenie at my side, we drove together over the hill listening (softly) to the Rolling Stones. Mission accomplished, we drove together back to the farm.

Upon returning, I broke out my gear. Yesterday I received some extra internal feeders. Part of the plan was to move feeding inside the hive to discourage robbers. Alas, the new feeders didn't come with floats (a wooden device that keeps bees from losing their footing and drowning in the syrup. Finding an old piece of 2x4, I fired up the saw and made a 1/2 dozen floats. Everything now ready, I donned the bee suit, walked down to the hive site, and lit up the smoker.

I was told that hives that have been without a queen for an extended period can have a rough adjustment to the new queen (once free, I guess re-subjugation is a difficult pill to swallow). Success can be increased by placing a frame or two of brood from one hive into another. So I opened up the hive next door, and found a nice frame with some brood and tried coaxing the bees off of the frame. This turned out to be quite entertaining. The bees were having a great time running from one side of the frame to the other. I would puff them with a little smoke, or softly brush them, and they would all run to the other side of the frame out of sight. After spending some time chasing them around, I became more aggressive with the bee brush, which agitated them some (they hate the "brush" and I generally try to avoid using it, but today I had business to do). A bunch of bees then decided to warn others about the brutish hand that was disturbing them. They all crawled onto the hand, turned their tails high into the air, and started fanning (this is their way of communicating that my hand was up to no good). I watched in amazement for some time. All of the bees fanning in synchronization in the same direction was quite a sight. Their movement actually vibrated my hand continuously, kind of like holding a cell phone in vibrate mode. Only with no pause. Some sensation I must say to actually feel the power of so many small creatures acting in unison. Quite remarkable.

In the photo above, you can see the honey comb this stronger hive had been building out. Beautiful and golden. When things are right, they are right.

Then I opened up the queenless neighbor. The hive still had plenty of bees. So my first task was to go frame by frame to make sure that a queen wasn't hiding in there somewhere. I'm not always quick to spot her, so this takes some time. Once the last frame was removed and no queen was found, I reassembled the hive and opened up her Royal Highness' cardboard coach.

Inside was the wooden cage. And in the wood cage was an energetic queen, moving quickly around with a few attendants who made the journey with her. You can see her on the top of the cage, standing upside down. She has been marked with a big red crimson dot on her thorax.

Each queen has her own scent. This scent drives bee-haviour. If I were to drop Her Majesty into the writhing hive, the other bees would not recognize her perfume. Unlike humans, who would simply shun the offending wearer, the bees would take the matter much more seriously... and kill her. Notice to the right of the cage, the space is filled with a white substance. This is a candy plug. It will take the attendants on the inside, and the workers on the outside a few days to eat their way out of a hole on the right of the cage. Just enough time for the new hive to become familiar with her scent, and come to adore her.

I sandwiched the cage, face down into some wax at the top of the middle frames. Then I installed the new internal feeders and filled them with sugar syrup and closed everything up. Now I wait. On Sunday or Monday I will return to ensure she has safely been able to escape from her sweet prison. God save the queen.